On the Inspection tab, you will see the current structure and contents of your study plan. The plan is based on the curriculum of your study group (the curriculum you have the right to study).
- View your studies in bigger or smaller units of studies using the objects marked in the Picture 1 Figure 1. Separate courses are visible or hidden.
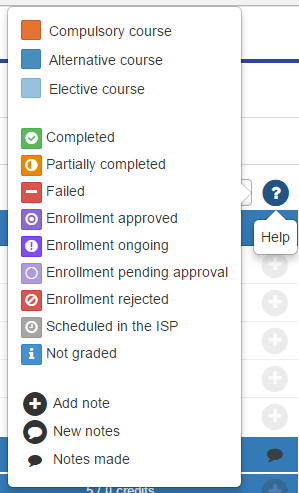
- Info box: Click the question mark at the top of the PSP to see the meanings of different symbols on the PSP (Picture 2Figure 2).
- Indicators to tell whether the course is compulsory, optional or elective: a color box to the left of the course name. To find out this, hover with a mouse pointer over the colored box or see the info box.
- Indicators of the course status: An icon to the left of the course name. To find out this status, hover with a mouse pointer over the colored box or see the info box.
- View the contents of study modules
- Click the name of the study module -> a modal opens, which shows the contents of the module.
- Close the window by clicking the x in the top right corner or Cancel link in the bottom right corner of the window.
- View the contents of a course
- Click the name of the course -> a modal opens, which shows the contents of the course.
- Close the window by clicking the x in the top right corner or Cancel link in the bottom right corner of the window.
- The extent of chosen studies in relation to requirements
- This ratio is visible on the right-hand side of the study module’s name.
- In the picture below 12 credits is chosen, 15 should be chosen, and 30 credits is chosen, and 30 should be chosen.
|
|---|

- Status box (on the right side of the page): See the number of chosen studies in relation to the credits required.
- Notices (on the right side of the page): see a list of your latest grades.
- Send for comments button in the top right corner of the window.
- This functionality is a part of the acceptance process of the PSP. You may ask comments on your PSP from your tutor teacher.
- Fill out the fields in the form, the recipient is your tutor teacher, message subject and message itself as usually in email. (Picture Figure3)
- Very important: Remember to sign your message. It will be sent to the teacher’s email but there is not any message sender.
- Send for approval button in the top right corner of the window.
- This functionality is a part of the acceptance process of the PSP. You ask your tutor teacher to accept the PSP you have formed. Here too, the recipient is your tutor teacher, message subject, message itself, as usually in email, and to sign the message is important.
- About acceptance process of the PSP
- The acceptance of the PSP creates the version of the study plan that the student can no longer edit.
- Immediately after the acceptance, a new draft version is created based on the accepted one, and you can edit the draft version when needed.
- You may choose the required PSP version from the dropdown listbox Select version of PSP.
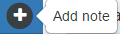
- Add note. With this functionality, you can write notes to courses in PSP or send messages concerning a course to a teacher.
- Click + sing or speech bubble next to the course or module name. The icon is a speech bubble when it already includes some notes.
- Icons:
- + sign will popup a similar form as with PSP message. There is a text at the top of the form that informs the course that message belongs to.
- The recipient is your tutor teacher or the course teacher and the message will be sent to teacher’s email. It is also visible on the teacher’s Peppi desktop. Teacher will also see it when he/she is reading a student’s PSP.
- Message subject and content like messages in general, remember to sign the message if you sent it to a teacher.
- The note will be visible only you if you do not write any recipient.
- Add note button will save the note in the PSP and will send it to a teacher if one is as a recipient.
- The tutor teacher can send notes to you. You will get an email of it and the note will generate a speech bubble next to the course.
- Filter selections (Picture Figure 4)
- With filter selections, you define what studies you want to inspect in your PSP.
- Study type: select the filter criterion based on whether the course is compulsory, optional or elective
- Study status: select the filter criterion based on the status of the course
- Scheduling: select the filter criterion based on scheduling
- Filter selection in use is marked next to the Filter selections button.
|
|---|
| Picture Figure 1: View your studies |

|
|---|
| Picture Figure 2: Symbols in use |
|
|---|
| Picture Figure 3: Send PSP for comments |

|
|---|
| Picture Figure 4: Filter selection |
