| Table of Contents | ||
|---|---|---|
|
Login
Go to justus.csc.fi and choose the preferred language in the upper-right corner. You can log in to JUSTUS-service by using Eduuni-ID. If you do not have an Eduuni-ID yet, the instructions for registration process are available here and more info about Eduuni here.
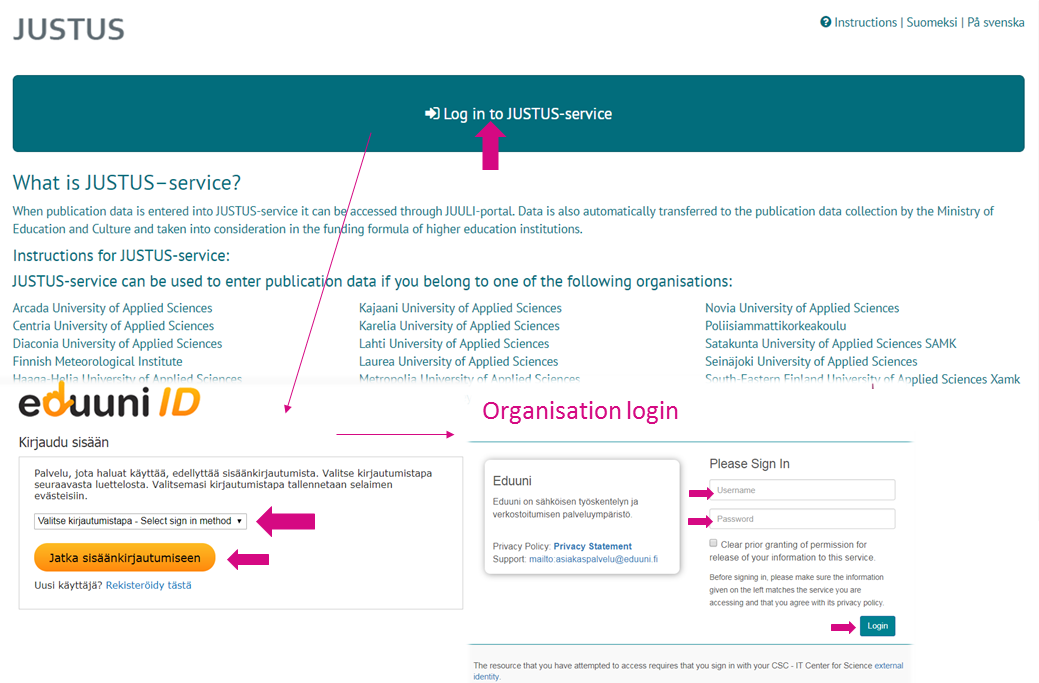
Click ”Log in to JUSTUS-service” on the main page and follow the steps below.
There are several steps in the logging in process if you have not logged in to JUSTUS service (or Eduuni) before. First, you need to choose your sign in method from the drop-down list (see the Eduuni window in the picture below). The method is usually your own organisation. If you have already went through this step at some point, the choice may have been stored in cookies and you will be redirected to your organisation’s log in window. Also, if you are already logged in with your Eduuni-ID elsewhere, JUSTUS-service opens directly when clicking the login button.
Functions
After the log in users are directed to the frontpage. The main page is slightly different for standard users and administrators. The picture below illustrates the view for standard users. Buttons only visible to administrators are added in the picture.
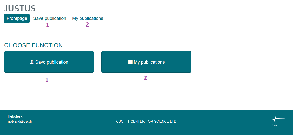

1) "Save publication" - allows user to enter publication information (see more Save publication).
2) "Saved publications" - allows user to see and edit all the publication information entered in the service by him/her (see more My publications).
Save Publication

To save a publication information in JUSTUS the user goes through four steps in the following order:
1. Prefill the form
Users are able to prefill some of the publication information if such information is available from the CrossRef or VIRTA services. Available information may vary and they may contain mistakes, so users are advised to double-check any prefilled information.
You can search publication information by using either of the following methods
- from CrossRef service by using DOI-identifier
- Type in the persistent address formed by the DOI-identifier
- Click "Search" to complete prefill
- from VIRTA or CrossRef service by using publication’s name (possibly filtered by author)
- Type in one of the authors' names in the upper field to filter the search
- Type in the publication's title (or part of it) and the service provides you with a list of possible publications
- Choose the correct publication
- Click "Search" to complete prefill
The prefilled information shows up in the step "3 Enter publication data". If information is prefilled using the VIRTA service the publication type is prefilled as well and the user is redirected straight to step 3.
If the user tries to prefill the information using the VIRTA service and some other user from the same organisations has already provided the publication information to VIRTA on the same publication, the user is notified by a possible duplicate.
It is also possible to enter publication information manually. Choose “Skip this phase and manually enter publication data”.
2. Choose publication type
Choose the correct publication type. The classification of publication types is available here (in Finnish) and in the document about Publication data collection instructions for researchers on this page.
Publication type must be entered if user is entering the publication information manually or the information is prefilled using the CrossRef service. When prefilling using the VIRTA service, the publication type is already prefilled and the user is redirected straight to step 3.
After selecting the correct publication type you will be redirected to the step "3 Enter publication data". You can still come back and change the publication type if needed, just click the step 2 from the top menu.
3. Enter publication information
If you prefilled the publication information in the step 1, you can see the prefille information on this page. Please double-check the information and correct any errors. For instance, check that all publication authors are imported and fill in missing information.
Enter at least the information for the mandatory fields, otherwise you can’t save the publication information. Mandatory fields are marked with a red asterisk (*). Read more about the mandatory elements in the publication information collection here.
You can also see a small info-icon next to each field. Open it by hovering your mouse over it (no need to click). This gives you more detailed information about the field, its definition, and possible instructions on how to enter the data.
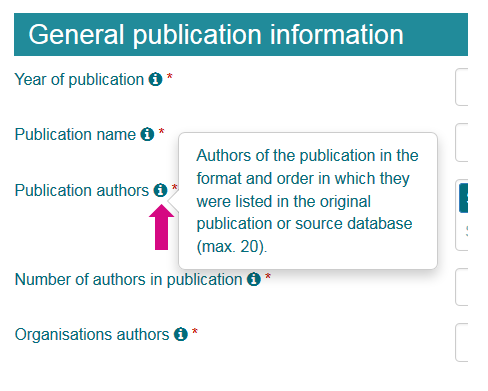
Pay attention at least to these fields:
- All authors mentioned in the publication will be listed in “Publication Authors” field, while only those of them affiliated to the reporting organisation are listed in the “Organisation Authors” field.
- Journal/series name: When you start typing the name, you can see a suggestion list of Journals/series and choose the right name from the list. The service imports Jufo-ID and the publication forum level of the Journal/series automatically.
Click ”Save changes and preview” when you have entered all the information needed.
4. Verify and save
Check once more the publication information you entered. You can still go back to the previous steps and correct any errors.
The information is saved by clicking "Save changes and return to saved publications"
After saving, you can see the entered publication information in the list of "Saved publications". It is still possible to edit publication information as long as they are not approved by the organisation's administrator.
KUVA
My publications
All publication information entered by the user is listed on this page. It is divided into Hyväksymistä odottavat julkaisut ja Hyväksytyt julkaisut.
Hyväksymistä odottavat julkaisut
- On this page, you can see the publications not yet approved by the organisation's administrator.
- Clicking the publication-ID takes you back to the publication information saving process and you may edit the information. Don’t forget to save changes by clicking "Save changes and return to saved publications" in the step 4.
KUVA
Hyväksytyt julkaisut
- On this page, you can see the publications that have been approved by the organisation's administrator.
- After the approval of organisation's administrator, the standard users are not able to edit their publications.
Functions (only for administrators)
After the log in all users regardless of the role are directed to the frontpage. The main page is slightly different for standard users and administrators. The picture below illustrates the view for standard users. Buttons only visible to administrators are added in the picture.
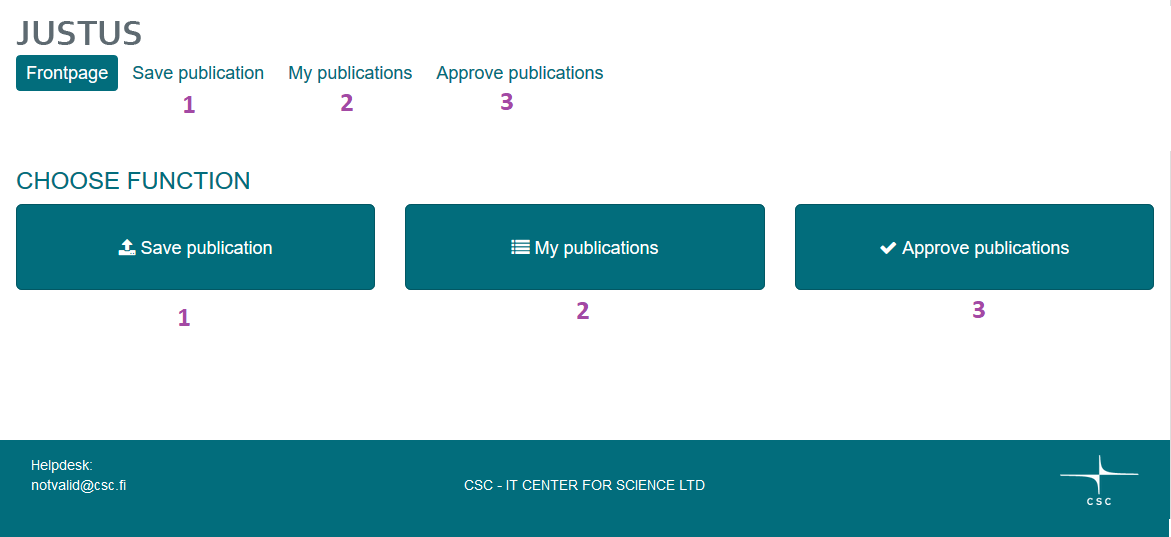
1) "Save publication" - allows user to enter publication information (see more Save publication).
2) "Saved publications" - allows user to see and edit all the publication information entered in the service by him/her (see more Saved publications).
3) "Approve publications" (only visible for administrators) - allows administrators to approve publication information entered into JUSTUS-service by him/her and all the standards users of the organisation to the VIRTA publication information system, to the JUULI publication information portal and to the annual information collection carried out by the Ministry of Education and Culture (see more Approve publications).
"Helpdesk:" Contact address provided by the organisations as a first point contact for their standard users who encounter problems. Any nonresolved issues should be forwarded by the organisation's administrators to the justus (a) csc.fi
”Instructions” in the upper right corner takes you to the JUSTUS-service's wiki pages. On this page, you will find basic instructions in Finnish, Swedish and English. Other information about JUSTUS is available too, but only in Finnish. Organisations are responsible for providing more detailed instructions for their standard users.
Approve publications
Only the organisation's administrators are able to access the "Approve publications". From here they are able to see all the publication information entered by any of the organisation's standard users and administrators. It is divided into Hyväksymistä odottavat julkaisut ja Hyväksytyt julkaisut.
Hyväksymistä odottavat julkaisut
All non-approved information entered by any of the organisation's standard users and administrators is shown in the list
- Clicking the publication-ID takes you back to the publication information saving process and you may edit the information. Don’t forget to save changes by clicking "Save changes and return to saved publications" in the step 4.
- Publication information may be approved by clicking on the different statuses in the most right column. The different statuses are as follows:
- -1 "REJECTED" - publication information is not forwarded from the JUSTUS service
- 0 "UNFINISHED" - publication information is missing some fields or other information and is not forwarded from JUSTUS-service
- 1 "READY/JUULI" - publication information is forwarded to JUULI portal. Publication information is not forwarded to the publication data collection by the Ministry of Education and Culture
- 2 "READY/MINEDU" - publication information is forwarded to JUULI portal. Publication information is also forwarded to the publication data collection by the Ministry of Education and Culture
- By choosing a status for the publication the standard user who entered the publication information is no longer able to edit the information (for him/her the publication moves to "Hyväksytyt julkaisut"). Thus by approving the publication as status 0 the administrator is able to "lock" the publication information from the standard user and only edit it himself/herself
KUVA
Hyväksytyt julkaisut
- All approved information entered by any of the organisation's standard users and administrators is shown in the list
- Clicking the publication-ID takes you back to the publication information saving process and you may edit the information. Don’t forget to save changes by clicking "Save changes and return to saved publications" in the step 4.
- If any of the forwarded publication information (i.e. status set to either 1 or 2) is changes, the VIRTA service will automatically check any modifications to the publication information and update the information in its database as well
- Changing the status of the publication information may be done freely, e.g. administrator can change the status for publication information from 0 to 2 when needed
- The changing of the status is taken into account by the VIRTA service
- VIRTA service checks for any new or modified publication information automatically from JUSTUS in every few minutes so there might be a short delay for approved publication information to show up in e.g. JUULI portal
Roles
Standard user
Standard user is anyone who logs in to the service and is identified by the organisation's domain (e.g. @xamk.fi). Standard user is able to
- enter publication information into the service
- view and edit the publication information he/she has entered
A standard user can not transfer the publication information further to the VIRTA publication service, to the JUULI publication information portal or to the annual information collection carried out by the Ministry of Education and Culture.
Administrator
Administrator is a user that is set by the organisation as an administrator for the JUSTUS-service and is identified by his/her Eduuni-ID. Administrator is able to
- enter publication information into the service
- view and edit the publication information both he/she or anyone else in the organisation has entered
- approve publication information both he/she or anyone else in the organisation has entered to be transferred from JUSTUS-service to VIRTA publication service, to the JUULI publication information portal or the annual information collection carried out by the Ministry of Education and Culture
Administrator is also responsible for the validity of the publication information.
Administrators log in to the system in the same way as standard users. The administrator authentication is based on the administrators group which is maintained in the Eduuni system. Please contact justus (a) csc.fi if you want to add or remove members in the organisation's admin group.