| Table of Contents | ||
|---|---|---|
|
Functions of the service
| Anchor | ||||
|---|---|---|---|---|
|
After logging in, users are directed to the service’s front page (picture below). The main page is slightly different for standard users and administrators. The picture below illustrates the view for standard users.

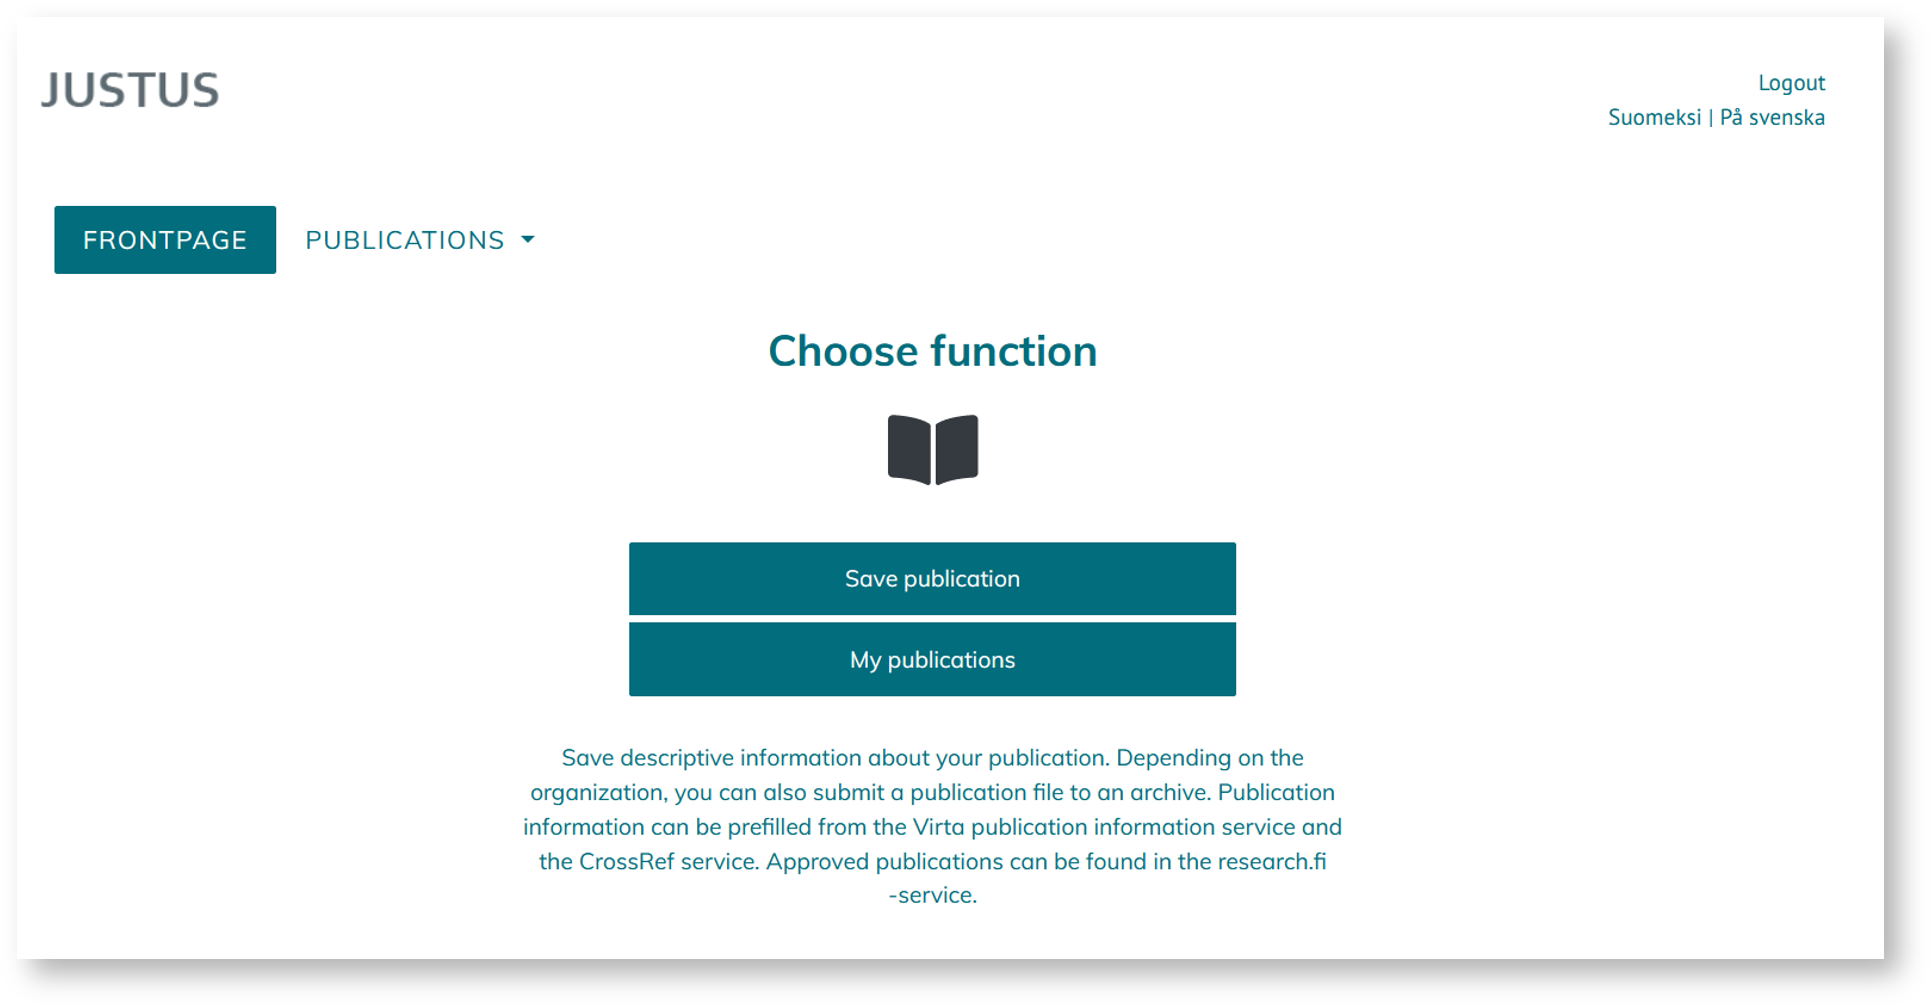
1) "Save publication" allows user to enter and save publication information (see “Save publication” from these instructions for more information).
2) "My publications" allows user to see all the publication information they have previously entered in the service (see “My publications” from these instructions for more information). User can edit a publication's information as long as it has not approved by the organization’s administrator.
Save Publication
| Anchor | ||||
|---|---|---|---|---|
|
To save a publication’s information in JUSTUS, the user goes through five steps (picture below).


The five steps of saving a publication are:
(1) prefill the form (optional)
(2) choose publication typeattributes
(3) enter publication information
(4) self-archiving
(5) verify and save
1.
PrefillPre-fill the form (optional)
| Anchor | ||||
|---|---|---|---|---|
|
Users are able to prefill some of You can start by pre-filling the publication information if such information is available , if your publication can be already found from the CrossRef or VIRTA services-publication information database. Available information may vary and they may contain mistakes, so users are advised to double-check any prefilled . Remember to always review any pre-filled information.
You can also skip this step by clicking ‘Skip this phase and manually enter publication information’ from the bottom of the page (picture below).

You can search publication information by using Publication information can be searched by using either the DOI-identifier or by using the publication’s name of the publication.
Searching publication information from CrossRef service by using the DOI-identifier:
A DOI search is only executed on the CrossRef database. Enter the permanent address generated from the publication's DOI identifier in the field and click "Search". NB The MINEDU specific fields are not available from the CrossRef serviceType in the persistent address formed by the DOI-identifier. Click "Search" to complete prefill.
Searching publication informationfrom VIRTA or CrossRef service by using publication’s name (possibly filtered by author)
Type in one of the authors' names in the upper field to filter the search (picture below).

You can also search for publication information by the name of the publication, in which case the information will be retrieved from both the VIRTA publication information service and the CrossRef service.
Enter the name of the publication or part of it (Type in the publication's name (or at least 5 characters) in the lower field and click ‘Search’ "Search" (picture image below).

Note restrictions regarding search words, see Detailed instructions for searching for publication pre-filling from the VIRTA service.
If you want, you can limit the search by the author's name in the upper text field JUSTUS performs a search from VIRTA and CrossRef services and the provides you with a list of possible publications (picture below).


Choose Select the correct desired publication name from the drop-down list menu that opens and click ‘Bring "Export the data to form’ the form" (picture below).


The prefilled information shows up information exported to the form is displayed in step "3 " Enter publication datainformation". If information is prefilled using the data is retrieved from the VIRTA publication information service the publication type is prefilled as well and the user is redirected straight , the publication's attributes are also imported to the publication (save step "2 Select attributes") and when saving the data, you go directly to step 3.
If the user tries to prefill the information using the VIRTA service and some other user from the same organizations has already provided the publication information to VIRTA on the same publication, the user is notified by a possible duplicate.
If the user is trying to enter and save publication information from VIRTA service that another user from the same organization has already entered, the service will notify the user about the possible overlay.
2. Choose publication typeHowever, you can also modify the the attributes that came with the pre-fill.
Identification of duplicates in prefilling
If you try to add a publication information from the VIRTA pre-fill for a publication that has already been reported by your organization, JUSTUS will notify you of a possible duplicate. You may choose to ignore the duplicate error-message.

2. Choose attributes
| Anchor | ||||
|---|---|---|---|---|
|
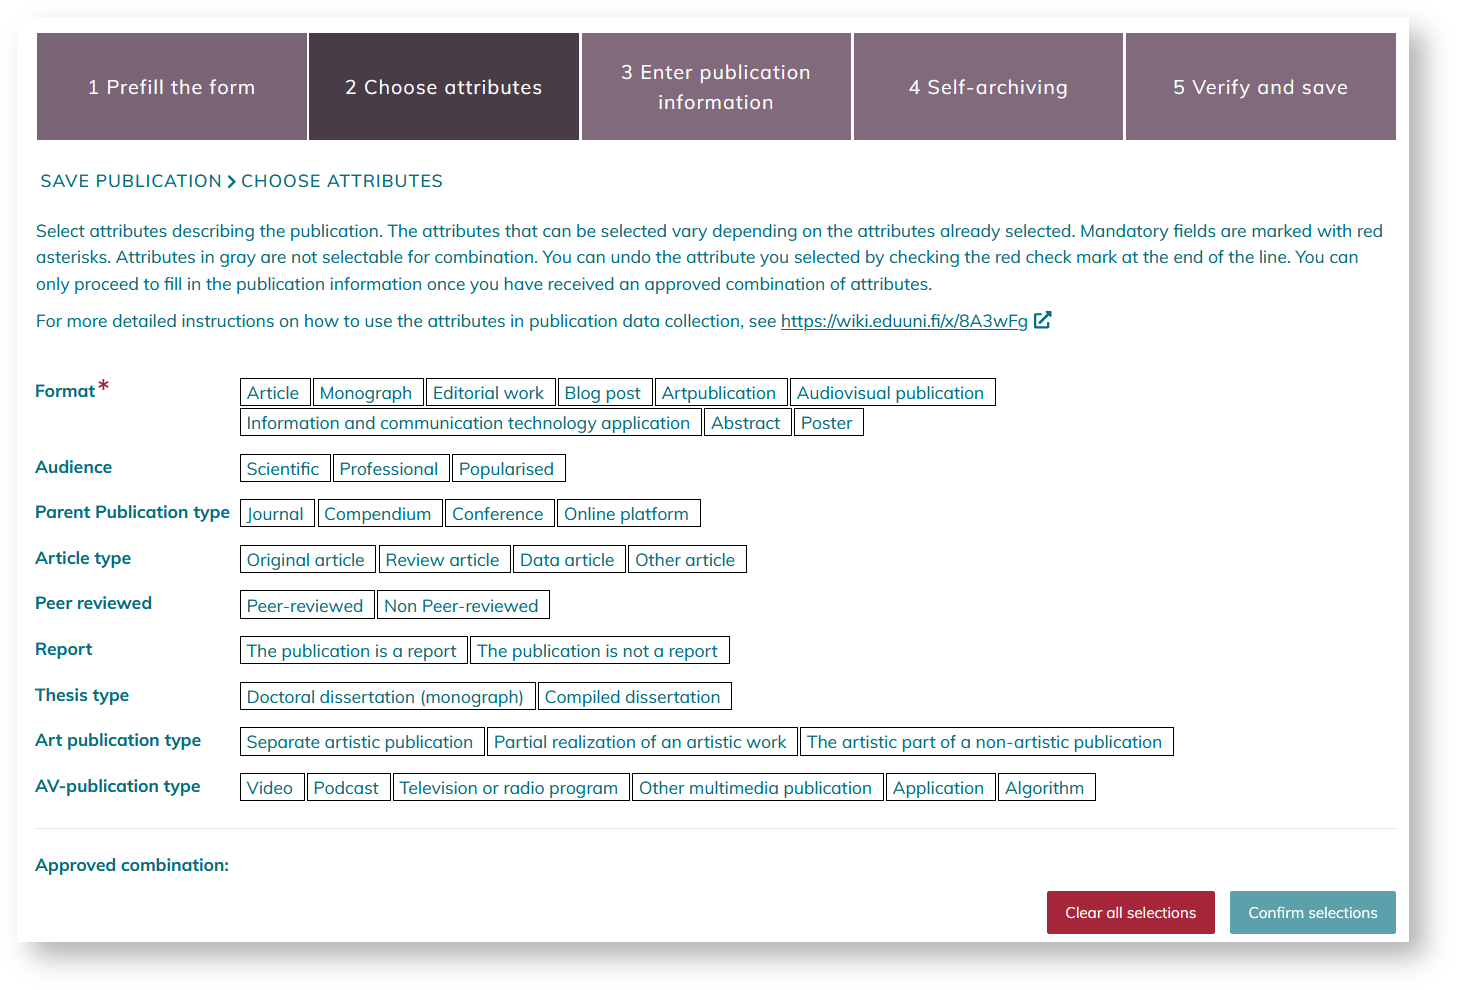
Choose Select the attributes that describe the correct publication type from the arrows on the right (picture below). The classification of publication types is available in Finnish at Publication types wiki page and in English in the document about publication. The attributes that can be selected vary depending on the attributes already selected. More detailed instructions for collection of publication data in attribute format can be found on the page Publication data collection instructions for researchers.

Publication type must be entered if user is entering the publication information manually or the information is prefilled using the CrossRef service. When prefilling using the VIRTA service, the publication type is already prefilled and the user is redirected straight to step 3.
After selecting the correct publication type you will be redirected to thethe author of the publication (coming soon in English).

3. Enter publication information
| Anchor | ||||
|---|---|---|---|---|
|
Check pre-filled information
If you prefilled applied for pre-filled information for the publication information in step "1 , you can see the prefilled information on this page. Please double-check Pre-fill the information", the information found will now appear on the form. Check the information and correct any the errors. For instance, check that all publication authors are imported and that Check, for example, whether the search has brought all the authors of the publication into the text field, and whether the page numbers are separated with a line hyphen (-) and not, for example, a question mark (?).
Fill-in the information
Complete Enter at least the information for the mandatory fields, otherwise you can’t save the publication information . Mandatory fields are marked with a red asterisk star (*). Read more . Mandatory information depends on the type of attributes selected for the publication. You can find more information about the mandatory elements data for publication data collection on the wiki page concerning publication information about the data content of publication data collection.
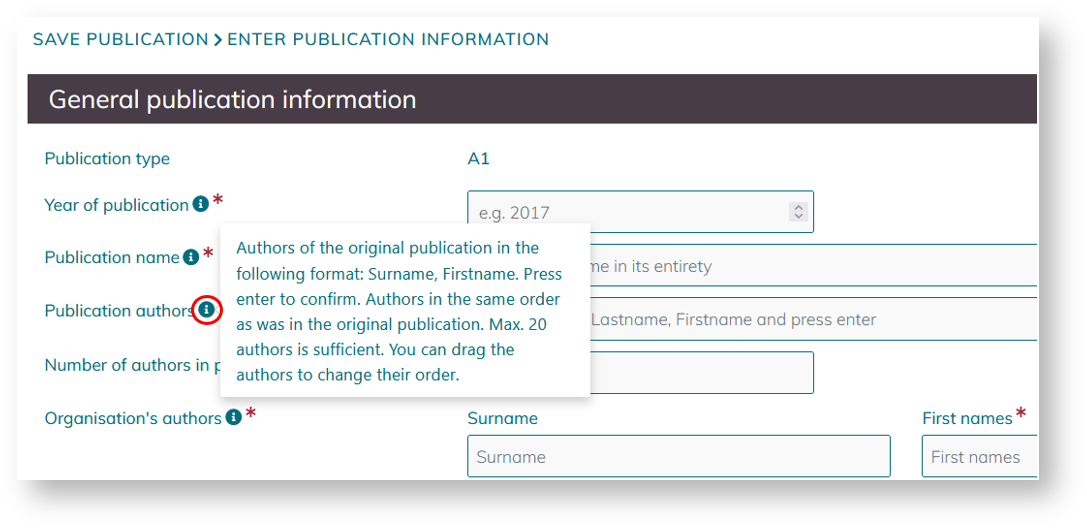
You can also see a small info-icon next to each field. Open it by hovering your mouse over it (no need to click). This gives you more detailed information about the field, its definition, and possible instructions on how to enter the data (picture below).

There is also an info balloon (picture below) for the data, which gives more information about the data being collected, its definition or how the data should possibly be reported in the form.
NB: Pay special attention to these fields in the form:
- All authors mentioned The publication authors section lists all authors of the publication in the same order and format as in the publication will be listed in “Publication authors” field, while only those of them affiliated to the reporting organization are listed in the “Organization authors” field. Spelling and order of the authors should be identical with the original publication.original publication. Only those authors who are affiliated with the organization saving the publication are entered in the "Authors of the organization" section.
- In the organization's authors section, you can use automatic pre-filling, if the organization's admin user has imported the author information to JUSTUS (see image below). In this case, the service offers a list of the organization's members in In the "Organisation's authors" field (see image below), the person saving the publication can utilize the automatic pre-filling of author information if the administrator of their organization has imported the author information into the service as a CSV file. In this case the service provides a list of the organization’s authors to the Surname field. With the choice selection of the surname, the author’s first names, identifier identification and organizational sub-unit information are also of the organization's author, as well as the possible ORCID identifier, are automatically filled into in the form.


- Higher education institutions must also report at least one subunit code related to the institution. The subunit codes are updated annually. The JUSTUS service uses the latest annual version of the organization's subunits found in Koodistopalvelu. The year of the subunit is basically the same as the year of publication. If you cannot find the year you want in the drop-down menu, this may be because the subunit data for the most recent year has not yet been submitted from your organization.
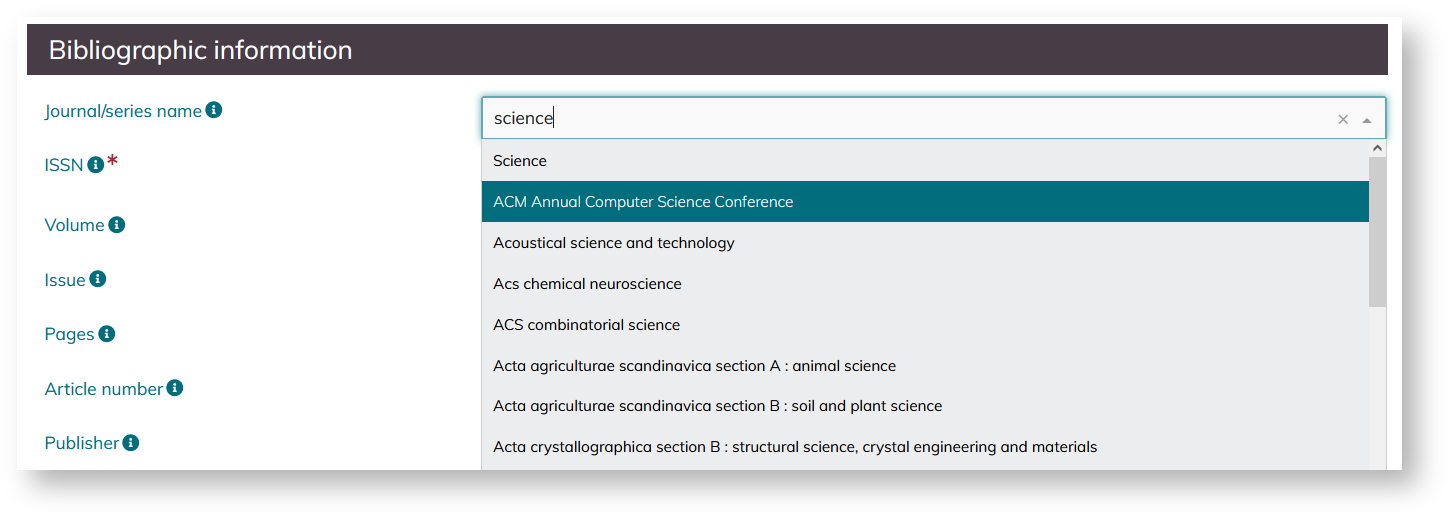
- Journal/series name: When you start typing the name, you can see a suggestion list of Journals/series from the Publication Forum portal After you have typed at least 5 characters of the name of the journal or series, a drop-down menu opens that lists publications from the publication forum database (picture below). The service imports JufoAlong with the journal/series name, the related JUFO-ID and the publication forum level of the Journal/series automatically.JUFO classification level are retrieved. If the publication channel is not found in the publication channel database, you can skip the suggestion.

- Suggestions to the ‘Key words’ field come from Finto Finnish thesaurus and ontology service’s general Finnish thesaurus YSA.service YSO - ontology.
When Click ”Proceed to publication file selection” when you have entered all the information needed in step 3, proceed to publication file selection.
4. Self-archiving
| Anchor | ||||
|---|---|---|---|---|
|
In step 4 of saving a publication, the user chooses one of "4 Self-archiving", select one of the three options: ‘Enter "Enter publication file’file", ‘Publication "Publication self-archived elsewhere’, or ‘Not self-archived publication’ (picture below).elsewhere" or "Not self-archivable publication" (image below)
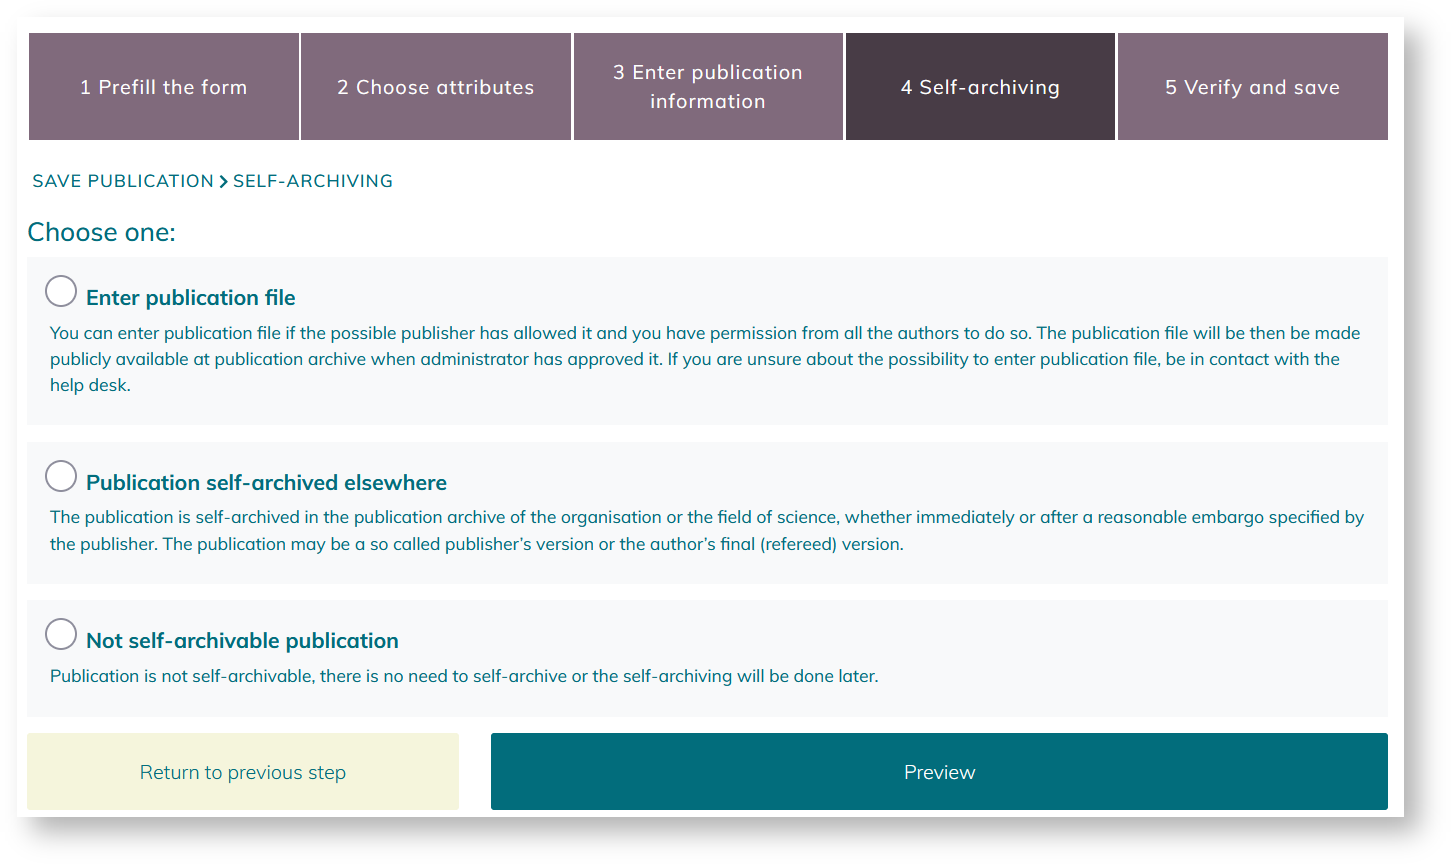

Enter publication file
This function is only available if your organization's publication archive is integrated with Justus.
You can enter publication file if the possible publisher has allowed it and you have permission from all the authors to do so. The publication file will be then be made publicly available at publication archive when administrator has approved it, unless an embargo time has been set. If you are unsure about the possibility to enter publication file, be in contact with your local help desk.
When you choose this option, a form opens on the page where you can fill in more precise publication information. NB! Only PDF files are accepted.
Publication self-archived elsewhere
Choose this option if the publication is self-archived in the publication archive of the organization or the field of science. Fill the website address of the self-archived version (e.g. URN) to the text field.
Not self-archived publication
Choose this option if the publication is not self-archivable, and there is no need to self-archive or the self-archiving will be done later.
After having chosen one of the three options, click ‘Preview’ from the bottom of the page.
5. Verify and save
| Anchor | ||||
|---|---|---|---|---|
|
Check once more the publication information you have entered. You can still go back to the previous steps and correct any errors.
The information is saved by clicking "Save changes and return to saved publications"
After saving, you can see the entered publication information in the list of "My publications". It is still possible to edit publication information as long as they are not approved by the organization’s administrator (see ‘My publications’ from these instructions).
My publications
| Anchor | ||||
|---|---|---|---|---|
|
All publication information entered by the user is listed on this page. It is divided into pending into pending publications and processed publications (picture below).


Pending publicationsAnchor Pending publications Pending publications
| Pending publications | |
| Pending publications |
On this page, you can see the publications not yet approved by the organisation's administrator. Clicking the publication-ID (picture below) takes you back to the publication information saving process and you may edit the information. Don’t forget to save changes by clicking "Save changes and go to publications list" in step 5.

These publications you can still edit yourself, if necessary.
Processed publicationsAnchor Processed publications Processed publications
| Processed publications | |
| Processed publications |
On this page, you can see the publications that have been approved by the organisation's administrator. After the approval, the standard users you are not anymore able to edit their publicationsthe information unless you are an admin.
Standard users and administrators
| Anchor | ||||
|---|---|---|---|---|
|
After the log in all users are directed to the front page of JUSTUS regardless of the role. The main page is slightly different for standard users and administrators. From the bottom of the page, you can find the e-mail address for for organizations's user support and privacy policy (if available), the sitemap, instructions, the accessibility statement, as well as information on privacy (picture below).


Support: contact address provided by the organisations as a first point of contact for their standard users who encounter problems. Any non-resolved issues should be forwarded by the organisation's administrators to justus@csc.fi.
Instructions: takes Takes you to to the JUSTUS-service's wiki pages. On this page, you will find basic instructions on how to use the service in Finnish, Swedish and English. Other information about JUSTUS is available too, but only in Finnish. Organisations are responsible for providing more detailed instructions for their standard users.page provided by CSC. Your organization may offer more detailed instructions eg. in your int
Standard user
| Anchor | ||||
|---|---|---|---|---|
|
Standard user is anyone who logs in to the service and is identified by the organisation's domain (e.g. @xamk.fi). Standard user is able to
- enter publication information into the service
- view and edit the publication information they have entered
A standard user cannot transfer the publication information further to the VIRTA publication service, to the Research.fi service, or to the annual information collection carried out by the Ministry of Education and Culture. After entering and saving, the publication information is directed to the organisation’s administrator for approval.
Administrator
| Anchor | ||||
|---|---|---|---|---|
|
Administrator is a user that is set by the organisation as an administrator for the JUSTUS-service and is identified by their Eduuni-ID. Administrator is able to
- enter publication information into the service
- view and edit the publication information they or anyone else in the organisation has entered
- approve publication information they or anyone else in the organisation has entered to be transferred from JUSTUS-service to VIRTA publication service or to the Research.fi service.
The administrator is also responsible for the validity of the publication information created by their organisation.
Administrators log in to the service the same way as standard users by using their organisation’s e-mail address. The administrator authentication is based on the administrator’s group which is maintained in the Eduuni system. Please contact justus@csc.fi if if you want to report changes in the organisation's administrators.The picture below (currently in Finnish, the English version will be added later) illustrates the view for administrators.
1) Save publication: allows user to enter publication information (more information in ‘Save publication’).
2) My publications: allows user to see and edit all the publication information they have entered in the service (more information in ‘My publications’).
3) Approve publications (only visible for administrators): allows administrators to approve publication information entered into JUSTUS-service by them and all the standards users of the organisation to the VIRTA publication information system and to the Research.fi service (more information in ‘Approve publications
’).4) Author information management (only visible for administrators): allows administrators to add and edit organization's authors. In this section, it is possible to search authors, export one’s organisation's author information saved in the JUSTUS service as a CSV file, import an updated file of your organization's author information into the service, and add new users to the service. For the time being, this function is only available in the test version of the JUSTUS service. It will, however, come to the actual service as well.
Approve publications
| Anchor | ||||
|---|---|---|---|---|
|
The organisation's administrators can access the "Approve publications" view from where they are able to see all the publication information entered by any of the organisation's standard users and administrators. It is divided into (A) pending publications and (B) processed publications.
A.Pending publications
- All non-approved information entered by any of the organisation's standard users and administrators is shown in the list
- Clicking the publication-ID (picture below, part A) takes you back to the publication information saving process and you may edit the information. Don’t forget to save changes by clicking " Save changes and go to publications list" in step 5.
- Publication information can be approved by clicking on the different statuses in the column on the right (picture below, part B). The different statuses are as follows:
- -1 Rejected: The publication has been rejected or contains significant errors (https://wiki.eduuni.fi/x/YH7qAg).
- 0 Incomplete, not yet public: Publication data will not be transferred into research.fi or reported in the data collection by the Ministry of Education and Culture, but the data might be transferred to specific separately agreed services.
- 1 Incomplete, public: Publication data may be published via the interfaces of the data repository and transferred to research.fi. However, the data is incomplete and cannot yet be used as part of the data collection by the Ministry of Education and Culture.
- 2 Completed/MinEdu: The publication may be reported in research.fi and it contains all the values required in the data collection by the Ministry of Education and Culture.
- 3 Not part of data collection: The publication is not included in the MINEDU data collection, the publication is reported in the research.fi service.
- By choosing a status for the publication the standard user who entered the publication information is no longer able to edit the information (for them the publication moves to ‘Processed publications’). Thus, by approving the publication as status 0 the administrator is able to "lock" the publication information from the standard user and only edit it themselves.

Processed publications
- All approved information entered by any of the organisation's standard users and administrators is shown in the list
- Clicking the publication-ID takes you back to the publication information saving process and you may edit the information. Don’t forget to save changes by clicking " Save changes and go to publications list" in step 5.
- If any of the forwarded publication information (i.e. status set to either 1 or 2) is changed, the VIRTA service will automatically check any modifications to the publication information and update the information in its database as well
- Changing the status of the publication information may be done freely, e.g. administrator can change the status for publication information from 0 to 3 when needed
- Changing the status is taken into account in the VIRTA service
- VIRTA service checks for any new or modified publication information automatically from JUSTUS in every few minutes so there might be a short delay for approved publication information to show up in e.g. the Research.fi service.